
The Northern Lights Information and Guide
.JPG)
Iceland is predominantly visited with one purpose, to see and photograph the Northern lights, also referred to as the Aurora Borealis. It is the aim of thousands of travellers who choose to come to Iceland and explore its nature and hope to get a clear day to view one of the most beautiful night scenes made by mother nature.
The bright dancing lights of the aurora are actually collisions between electrically charged particles from the sun that enter the earth's atmosphere. The lights are seen above the magnetic poles of the northern and southern hemispheres. They are known as 'Aurora borealis' in the north and 'Aurora australis' in the south. Auroral displays appear in many colours although pale green and pink are the most common. Shades of red, yellow, green, blue, and violet have been reported also.
The lights appear in many forms from patches or scattered clouds of light to streamers, arcs, rippling curtains or shooting rays that light up the sky with a slight glow. Generally, the lights of the Aurora generally extend from 80 kilometres to as high as 640 kilometres above the earth's surface. To be able to see it at it's best, a clear night would be best to appreciate the different colours. Taking advanced photographic equipment and tripods is recommended in order to capture and adjust the light intake to make the best pics.
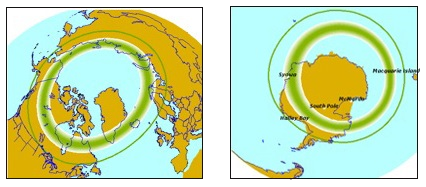
Because the phenomena occurs near the magnetic poles, the further north (or south) to the poles you are the best you will be able to see it. However, the effect is only like a circumference around the poles. Therefore if you are in the pole itself you will not be able to see it. The best places to watch the lights (in North America) are in the northwestern parts of Canada, particularly the Yukon, Nunavut, Northwest Territories and Alaska. But also its popular to see the auroral displays over the southern tip of Greenland and Iceland, the northern coast of Norway and over the coastal waters north of Siberia. Southern auroras are not often seen as they are concentrated in a ring around Antarctica and the southern Indian Ocean. Areas that are not subject to 'light pollution' are the best places to watch for the lights. Areas in the north, in smaller communities, tend to be best.
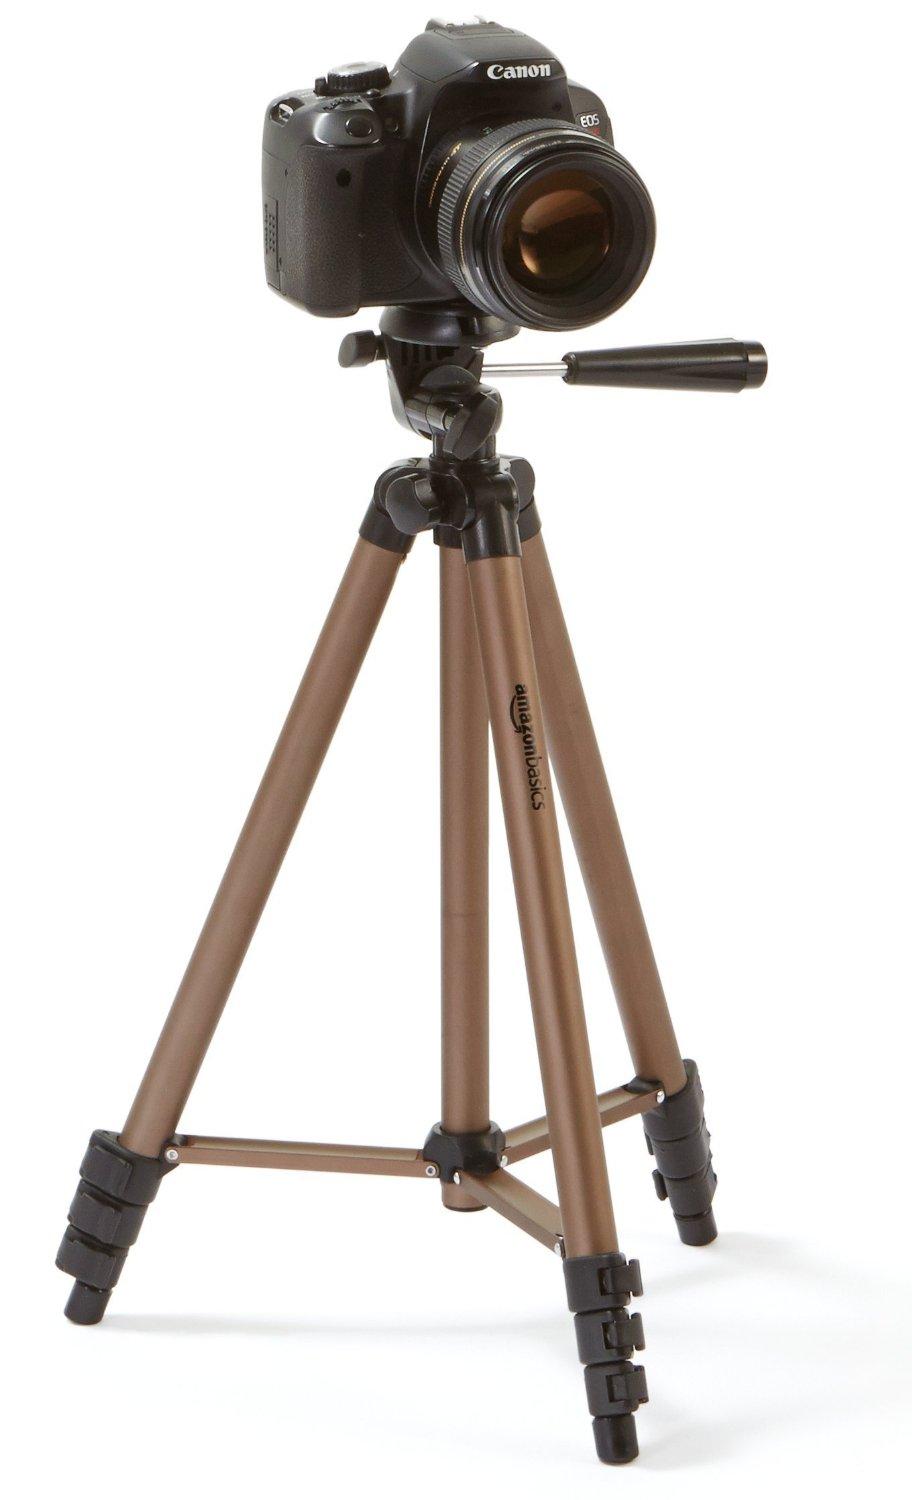
The amount of solar activity is key to be able to see the Northern Lights with your own eyes. Generally a 60% of activity of higher is enough to appreciate the greeny colours with your naked eye. However, to capture true images of the Northern Lights it's essential you take some advanced photographic equipment. DSLR cameras or Reflex cameras (usually Canon or Nikon) and a tripod for stability. Although you can also wedge your camera on the floor and with the help of some stones make it stable to shoot the pictures into the sky.
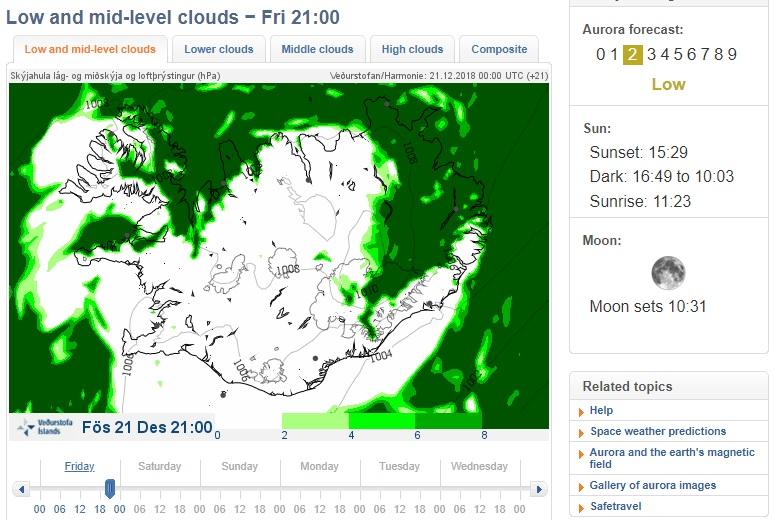
The weather factors are key to witness the natural phenomenon, although it's hard to predict 100% when the right time will be, its now possible to access advanced meteorological information online and plan your trip to see the lights. The best online website in Iceland is the official met office which gives great prediction on the Aurora lights, sun-set times and real-time cloud movement in order to plan ahead. Click to view the link on Icelandic Met Office.
To witness the aurora borealis in all their glory requires patience, luck, and the following conditions to be met:
- You must be visiting between September to April. Best in the Winter months when there is more darkness.
- The night must be as dark as possible (a fuller moon, for example, will dim the aurora)
- There should be as little unnatural light (light pollution) as possible.
- There should be little or no cloud cover.
- There must be enough solar activity.
You might wonder, how do I take the best photos of the Northern Lights? Despite what you may think, it's not all Photoshop editing when taking pictures of the lights. The perfect picture is within your reach if you get acquainted with a few of the less used buttons on your camera. It's all about the settings, and getting the exact setting for the right conditions requires time, patience and very slight adjustments in order to get the perfect photo! Here we are not going to give you a lecture on photography, as this may require even weeks of preparation and testing until you can take great photos. But there are a few things that might help you take even better pictures when travelling to Iceland and photographing the lights.
- Exposure time: The lights are dim, that's why you can't see them in daylight. Setting a longer exposure time gives the camera time to take in more light than it usually would, resulting in brighter lights in your photos.
- Stability of your camera: As the exposure time is longer, it gives you more time to move the camera, resulting in a blurry photo. Steady hands aren't enough! A tripod is essential or in the lack of it, a stable surface on the floor or something to wedge your camera against to. Also when taking a picture, use the time shutter feature (usually 2 sec) of the camera or a remote shutter button. This gives extra stability and avoids the camera moving when you press the camera at the very beginning.
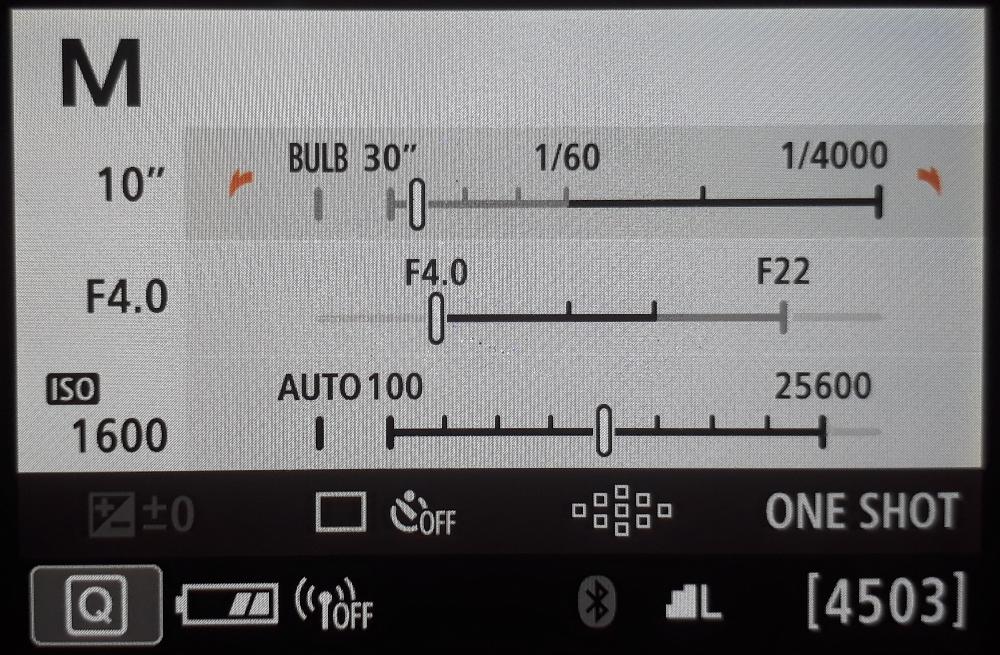
- Aperture: Generally described as the "A" setting of your camera. It controls the depth of the field, that is, how much of your photo is subject is in focus. It dictates how much light is getting into the lens because you are dictating how "open" the lens is. A low number means that the lens is more open, and thus, more light gets in. The value is represented by a "F" on the camera. For the Northern lights is best to adjust the "F" value to its lowest. (this will depend of the type of lens you have). Generally 2.8, 3.5 or 4.
- ISO: Is how sensitive you want your camera tobe to the light. Be careful when increasing it in daily use, since the photos, will become grainer as the ISO goes higher. That doesn't mean you should just set it to 100 and forget about it, the ISO can be a powerful tool, you just need to find out what works for each setting. Generally a 800/1600 ISO setting is enough for the northern lights.
- Shutter speed: It measures how long the lens stays open to take a picture. If the lens is open for a longer time, more light gets in, and you get better exposure. For the Northern lights try 10, 15 or 20 seconds shutter speed.
- Manual Focus: All cameras usually come with automatic focus, but at night there is nothing to focus on, therefore your camera will not be able to take a picture. To avoid this you need to set the focus to manual. (MF). After taking the first pic if you don't see the sky in focus, try turning the lens focus the other way.
Taking great pictures of the Northern lights requires lots of patience and ideal weather conditions. It's not common to get a perfect dark blue sky with a strong green reflection of the Aurora phenomenon within the first few photos! Many of the pictures you take might look unnatural, slightly too bright or un-focussed. For most amateur photographers, even for us, we need to edit the pictures using computer software. Creating a balance of the real photo and the edited picture is hard and requires a balance of colours, adjusting the saturation, tint and colour temperature. Also the exposure can be later adjusted with brightness, contrast, shadows and highlights. After you have done your editing the pictures can reflect a more night-feel and highlighting the green Aurora colours. It's all about "playing around" and experimenting until you get your preferred and desired look!
Some of programs available to edit are Photoshop®, or Lighroom® as the most common. But you can also edit on basic Windows, using the Windows Photo Gallery viewer or Paint.net.
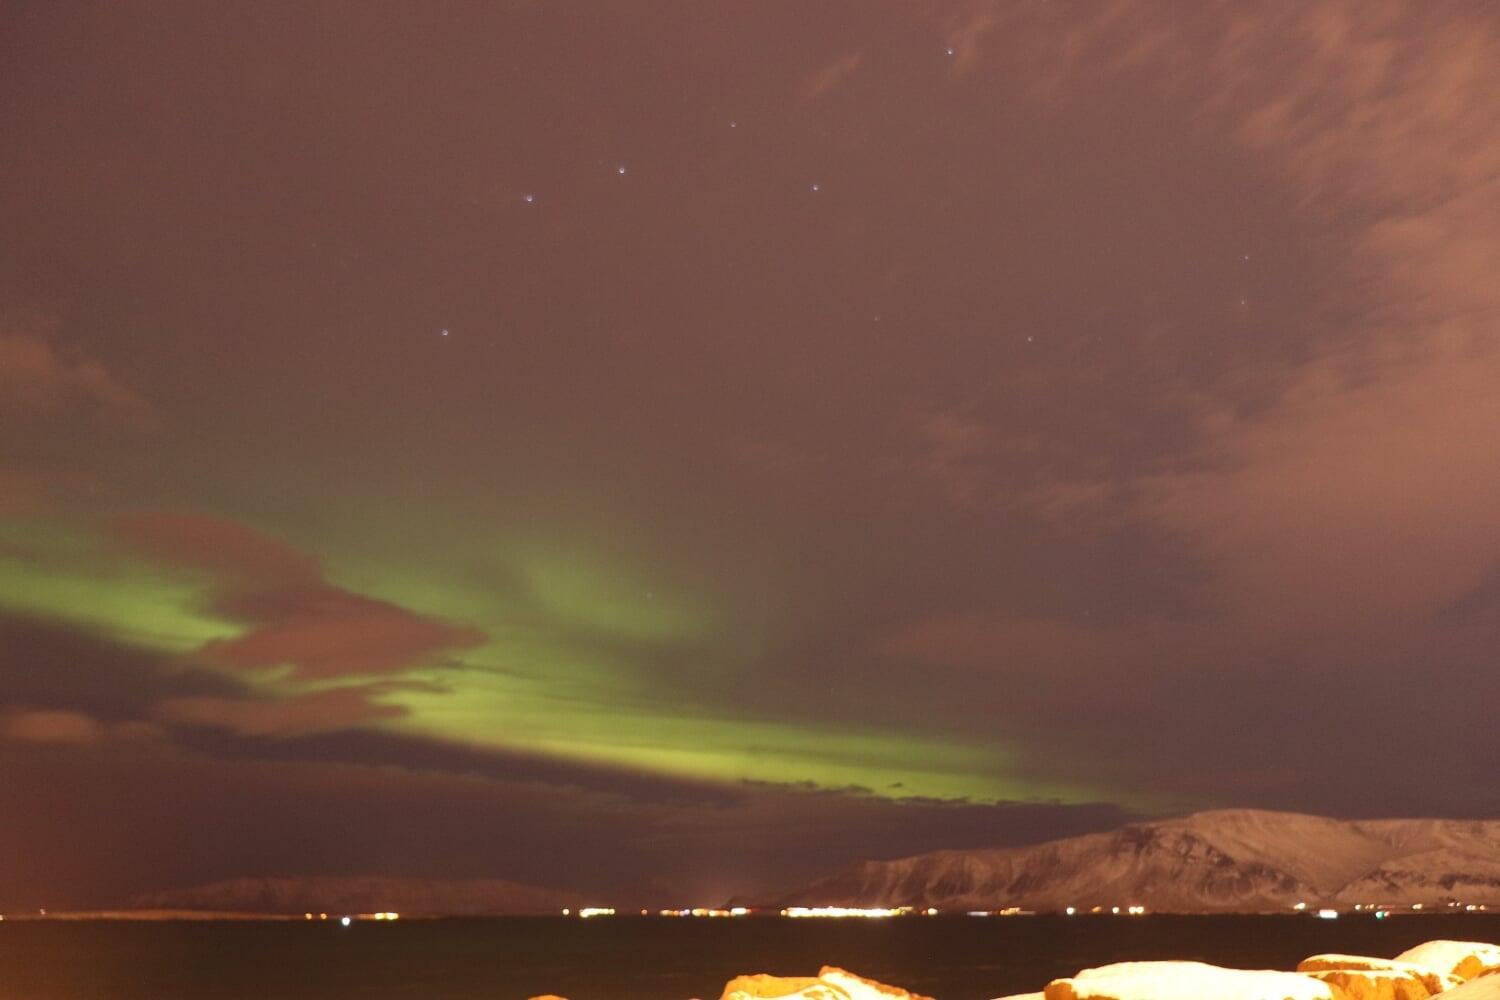
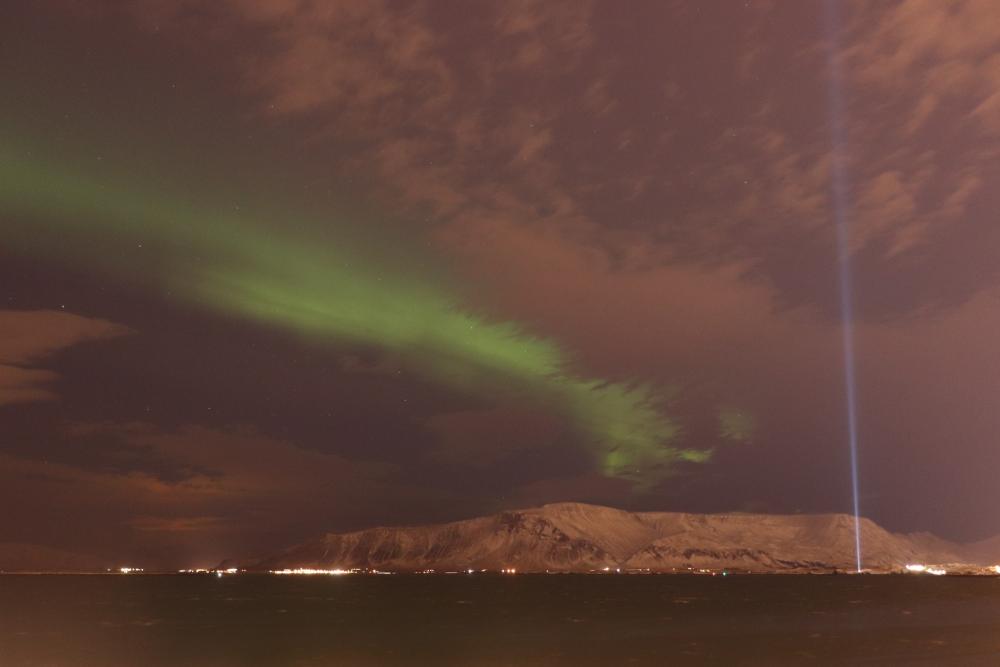
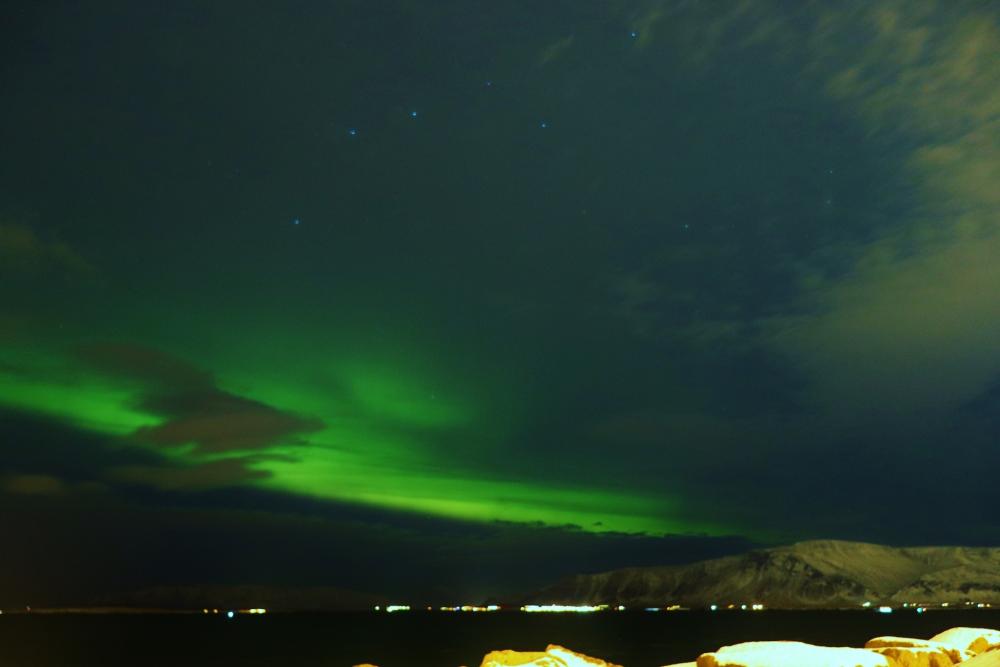
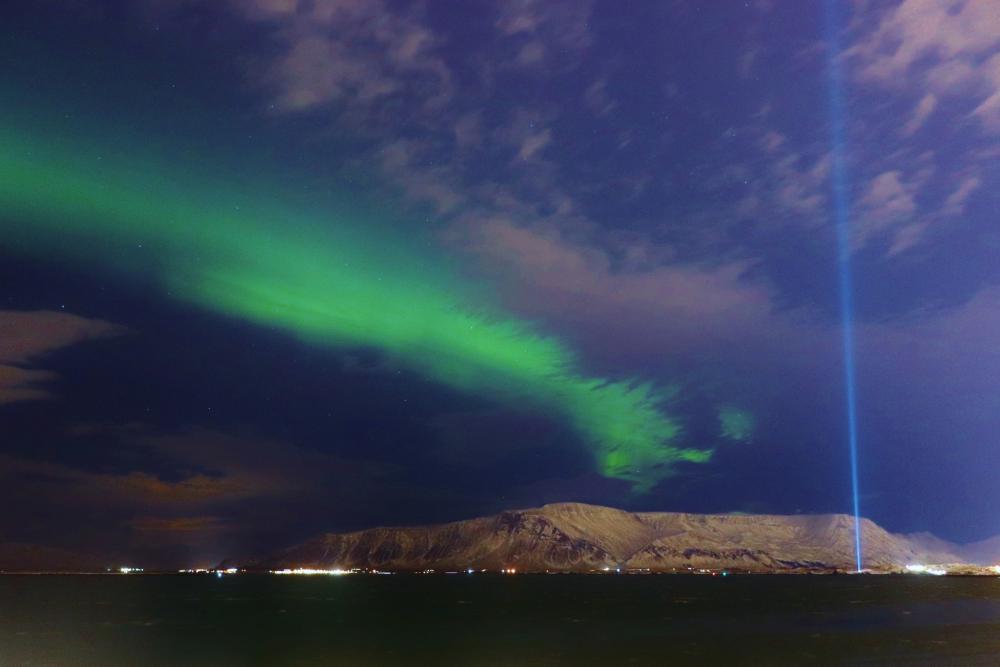
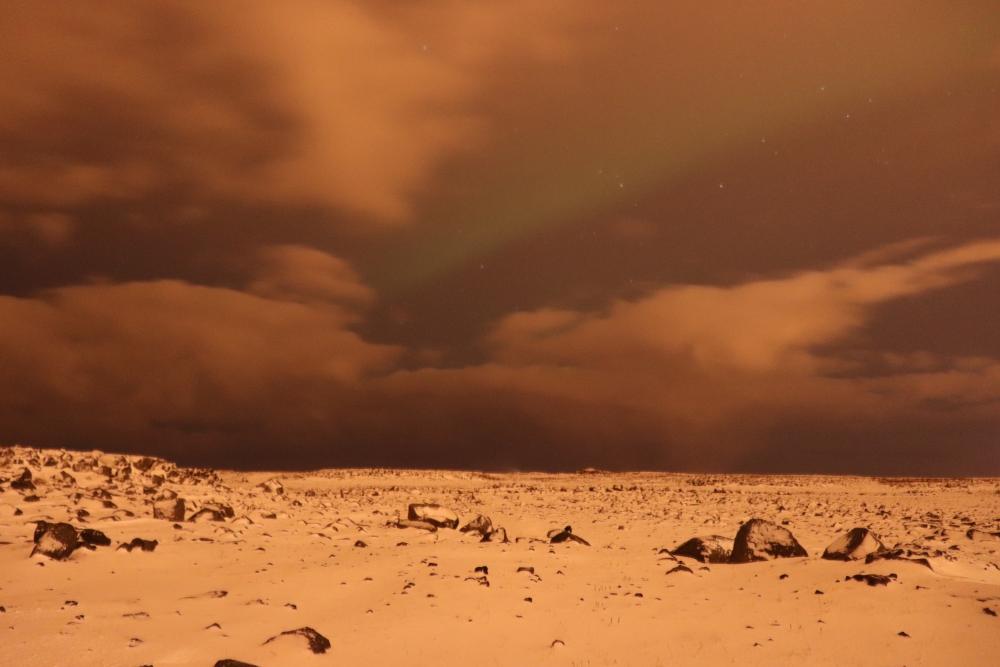
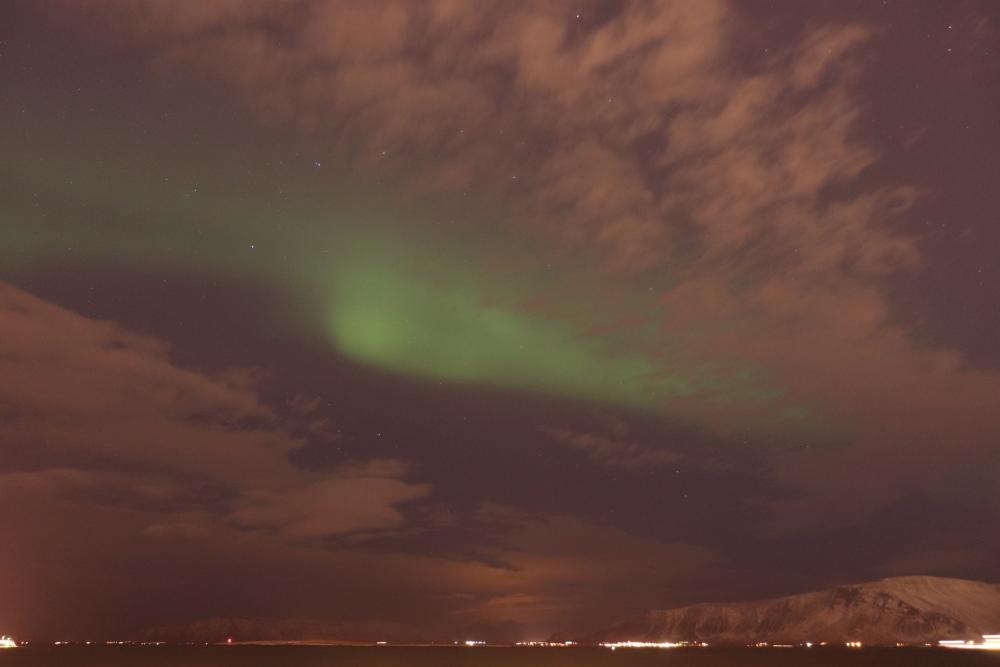
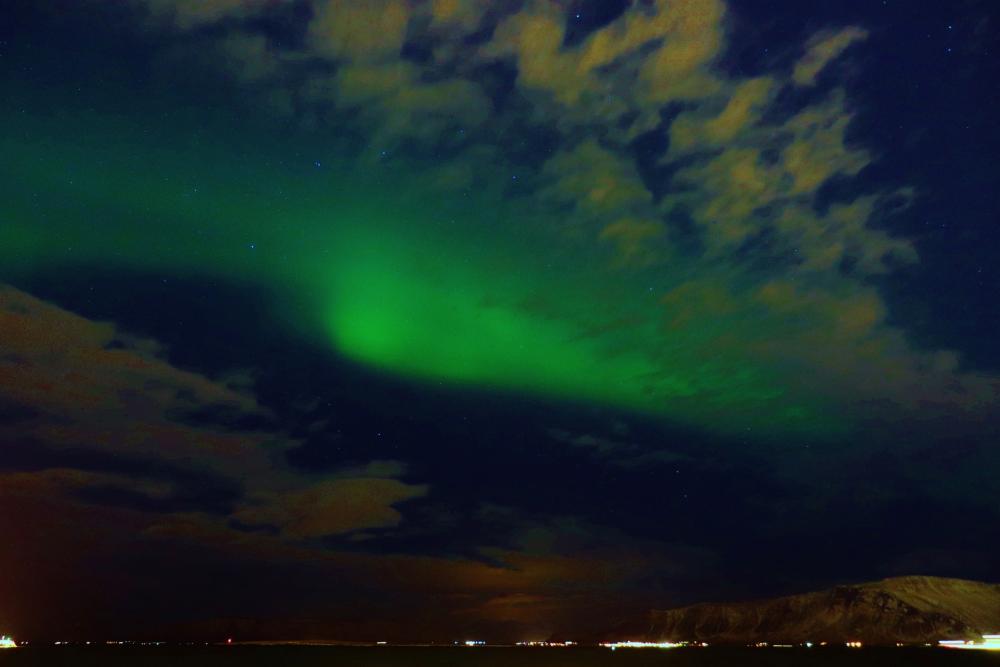
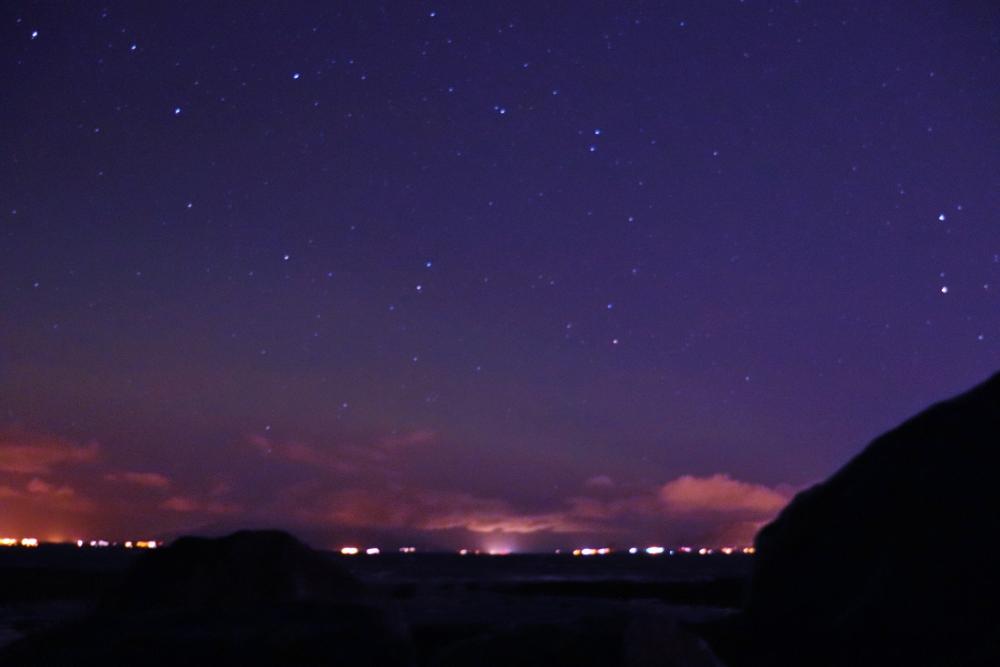
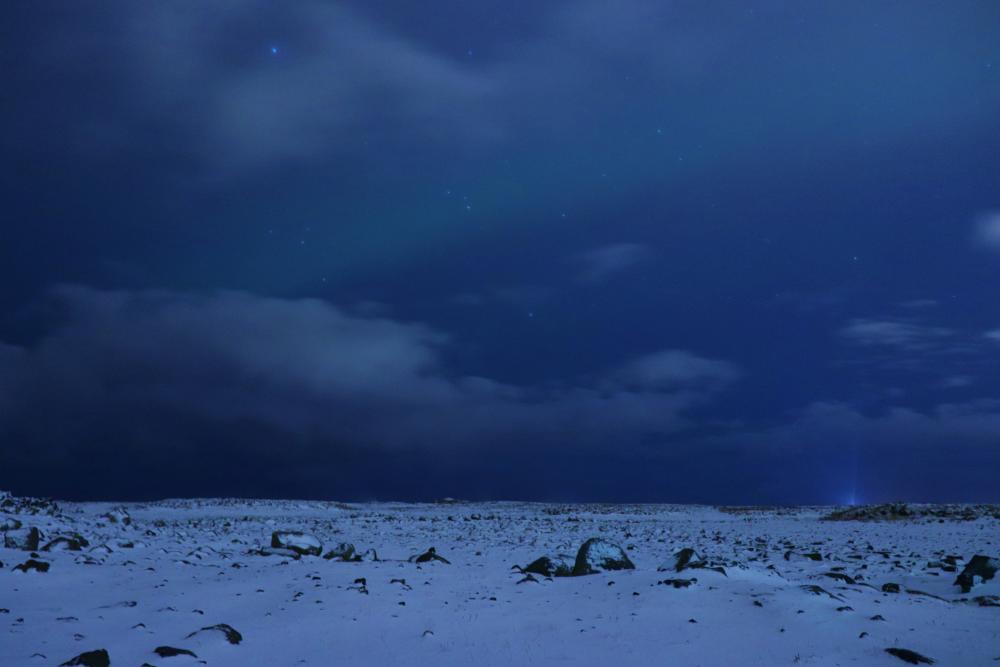
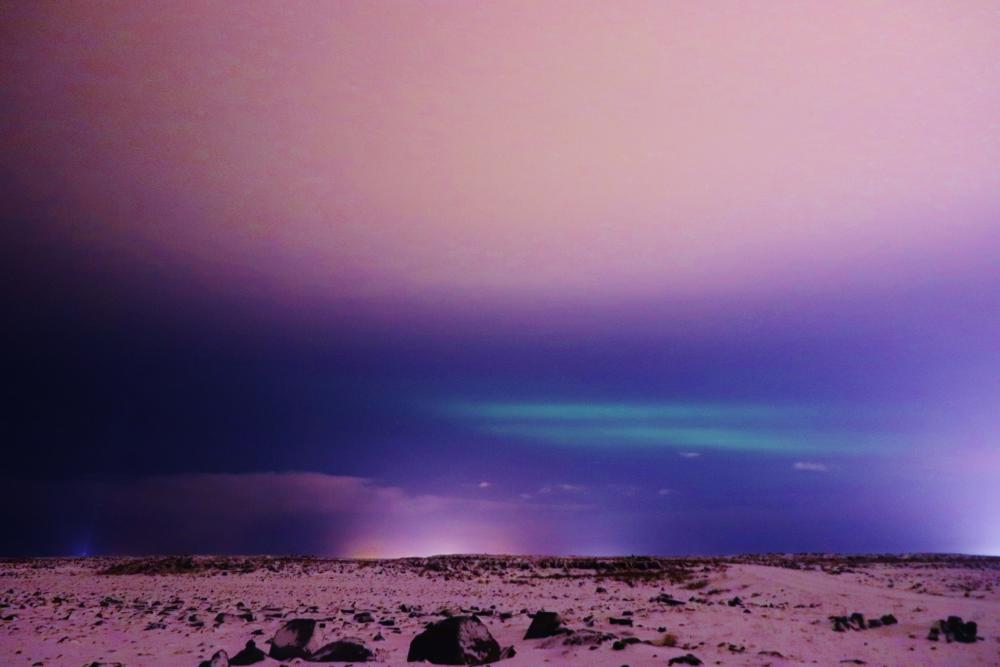
Below are some examples of photos taken by us and how we have enhanced them to represented a more realistic feel at night and highlight the Northern Lights:

To get the best opportunity to see the Northern Lights in Iceland, you have 5 options. The first is to hunt for them without leaving the town you are staying in hoping they will shine over the local area by chance, the second is the take a guided tour out into the nature; the third is to drive out and search yourself; the forth, you could take a boat cruise, and finally fifth, you can take a tailored package trip which includes the flights, transportation, private tours and many other activities when staying for longer. Each of these options has its advantages and disadvantages.:
- Northern lights by foot: The best way in which to see them is to find the darkest place possible and wait until your eyes have adjusted. Perhaps the best spot in Reykjavik city, is by Grótta lighthouse, on the Seltjarnarnes Peninsula in the north-westernmost point of the capital. There is very little light-pollution along this stretch, meaning that, on clear nights with a good forecast, you have a great shot at spotting them.There is also a little geothermal tub, which you can warm your feet up in while waiting for them to show.
❗Attention: When walking to the lighthouse, there is not a clear path, as the tides of the ocean come in and out, making the terrain very wet, slippery and rough. At night it's hard to guide yourself around, hence the lack of lights. Staying along the main path is the safest option. Also note that there area can be very windy. Adequate clothing required.
- Northern lights by tour: The most common way to see the aurora borealis is by taking a guided tour into nature. These tours run regularly from September to April whenever the lights are expected, and if they are cancelled or unsuccessful, you will get another opportunity to see them for free. We can recommended to book with Reykjavik Excursions, as one of the most popular, economical and experienced agencies that organise tours to see the Northern lights, as well as, other multiple tours which can be bought online from their website. There are combo tour packages as well for €80 including the Northern lights and the Golden Circle.
- Northern lights by self-drive: If you have a valid driver’s license (EU licence, American, Australian, or NZ), you have the option of renting a car, and hunting for the Northern Lights yourself. This option means that there will be no other group members distracting you on your tour, no time limitations and that you can choose where you go hunting.
❗Attention: Before taking this option, it is essential to be aware of your restrictions. Though in September, October and April, the roads are largely clear of ice, they can be rather treacherous from November to March. If you have little experience driving with ice and snow conditions, darkness and rural surroundings, it is best to look at alternative options.
- Northern lights by boat: Another way to enjoy the incredible phenomenon of the aurora borealis is by watching them on a boat tour. Available both from Akureyri and Reykjavík, these tours take you out to sea, far from any light pollution, where you have a great opportunity of a sighting.These tours are very convenient, heading straight out into Faxafloí Bay or Eyjafjörður Fjord from the downtown harbours of the respective towns. It does not take long from either destination to be far enough from the city lights to start looking to the skies in hope.
❗Attention: The boat tours are only advised to take if the amount of solar activity is high and you are able to see the lights with your own eyes. When using cameras and recording equipment, it's hard to capture stable images of the lights due to the rocketing movement of the boat.
- Northern lights by package tour: If you want your holiday to Iceland to be focussed on seeing the lights first-hand, there are plenty of winter self-drive vacations and package holidays that will make this a possibility. There are plenty of packages and tours which are organised from small tour companies which you can buy in person, to more advanced package tours which are available from the airlines, hotels and other professional companies for a more personalised tailored experience. Tour packages can range from 3 days to 2 weeks in Iceland, and include hotels, private transportation, city tours, meals, special activities and main sights as the South Coast, Jökulsárlón glacier lagoon, Snæfellsnes Peninsula and the Golden Circle. The great advantage of these tours is that you have many more opportunities to see the Northern lights, thus seeing more places in Iceland. Prices can range from €350 per person for a basic package to €2.500 for a more detailed and tailored trip.
Northen Lights Photo Slide 📷


All photos have been taken by Planet Airlines during our visit to Iceland. (Photos are edited to enhance night colours)